Monday, June 13, 2011

How to do Krylon Multi-Cam Type Camouflage Paint Job

How to do Krylon Multi-Cam Type Camouflage Paint Job

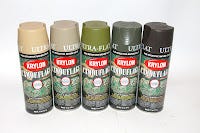
All too often we wished one or another product we own would be a little less obvious out in the field. Paint becomes the obvious and most simple answer to the problem.  The atypical selection of flat low reflective paint is limited to generally the black and white color schemes, however a few years back Krylon introduced a specific set of ultra-flat non-reflective natural color spray paints just for camouflage.

Now these paints are better than ever with Krylon's proprietary "Fusion" paint technology for improved bonding with plastics and other materials, primerless application and improved chip resistance, and new style no clog tips. As with any Krylon paint it is as easy to use as any spray paint so no special skills are required for application.  Even better yet, for about $20 you can own the full set of six colors which will provide coverage for numerous small projects.


SURFACE PREP
Krylon recommends the surfaces be clean, free of rust and if shiny, lightly sanded to improve bonding.  I usually wipe down my metal and plastic parts with rubbing alcohol and allow them to completely dry.


THEORY OF MODERN CAMOUFLAGE 
Much has changed is the ideas of camouflage since Vietnam era patterns.  One of the newer ideas in camouflage was originated and developed by Multi-Cam and utilize blurry blended backgrounds combined with sharp abstract shapes.  The blurry background bit is simple for the DIY'er, however the sharp abstract shapes can be tough, however I think I have pulled off a fairly good option.

MY PROJECT
I plan on painting a number of pieces of equipment however I thought it best to start with something inexpensive for practice before I moved on to more expensive shotguns, rifles and equipment.  My choice came when shopping for a camouflage shooting tripod and realizing I already owned a tripod in the form of an old hand-me-down circa 1960 camera tripod that was made to handle the heavy cameras and 8mm cameras of old.  By adding a simple "V" fabricated out of an old plastic cutting board that screws into the camera mount, I had a stable standing height shooting rest.  It was however pretty obvious standing in the grass.

TOOLS & STUFF USED
  • Krylon Paints in Sand, Khaki, Woodland Light Green, Olive, Brown
  • Disposable Rubber Gloves
  • Camouflage Templates Downloaded from Krylon and cut out the inside of the pattern for make paint masks

MAKING YOUR OWN CAMOUFLAGE TEMPLATES/MASKS
There is some science to camouflage shapes, however I have done successful and usable camo using pretty much any shape include skulls, smiley faces, logos, and plastic loops from a six pack of beer.

You can use a piece of gutter mesh with random tape pieces applied which will give you a snake like camouflage.  Airbrush stencils such as this snake pattern Art-Tool stencil are expensive but they work extremely well and hold up for years if cleaned.

You can draw your own random amoeba or leaf shapes on a piece of paper and cut them out, or even use a leafed branch as a spray through template... all work well.  I have an old box of acetate Power Point projector films (you know the ones we used to print out and put on a projector).  These old films work great as printable templates and can be used over and over again and cleaned with most solvents... just cut out the design with an exacto knife and you are ready to go.  The one general golden run is to have at lease one long stringy, one, fatter wider pattern, and one smaller random pattern.  Camo will work with just one pattern however it will turn out and work better when various patterns are used. 

APPLICATION

As with any paint job you always want to build the paint colors from lightest to dark.  I painted the   Spraying from a distance of 6-12 inches provides various degrees of blending which allowed for the Khaki base to blend in with the Sand and Brown blended in areas.  These blends where done by passing the spray across the tripod at various distances.  The longer distances provided shadowing and the shorted provided more pronounced color changes. As paint job stood at this point it did a pretty good imitation of a desert camo paint job, however since we have some green here, I continued.

The next step was to add in the foliage based Olive and Light Green colors using the templates.  The goal here is to add crisp shapes vs blurry backgrounds, so this can take a while.  Here is where I would hold a leafed branch over the object and spray though it as a template or use your template shapes.  I recommend you tapes on the template.  You will want to spray the olive green and then Brown, and then light green over the template without moving it.  As with a leaf they transition from one color to another.

Swap templates and repeat the process... in my case it was about 30 times and in about 45 minutes and several beverages later, I had the tripod complete.  There is where you might want to have a variety of templates, because the templates start to get soaked with paint and start dripping on things.  If a template gets too wet, stop and replace it with another template on the next move, otherwise you will start to screw up the paint job.

Lightening the darker shadowed areas.  As you can see form the below before and after pictures, I should have kept the inside of the tripod rails lighter. This lighter color in the shaded areas will offset the darken color of these areas and provide better blending. This of course is an easy fix, however learn from my initial mistake.

The nice thing about the Krylon Camouflage paint is that if you live in a greener, browner, or sandier area... use more of those colors and omit the ones which do not match the surrounding environment and you can of course change and update the colors as needed at any time.


BEFORE & AFTER
Not to bad for a DIY camouflage paint job.


CURE TIME
The Krylon Camouflage paint dries to the touch fast in a matter of seconds, however it will fully dry in 24 hours with chip resistance reaching maximum protection in 7 days.  The project can be used after the first 24 hours however I recommend you let it fully cure before subjecting it to harder use.


WHAT I LIKE
This project was easy and cheap.  Krylon has not only provided an easy to use product, but also great How-To guides, Free Camo Pattern Templates, and Tips and Tricks to make you project successful.  Even if you go all random freehand-painting comando and omit any patterns, you will still end up with an effective camo job, however with patience and some practice you can end up with a truly exception paint job.

The paint is VERY flat and low reflective and does exactly what it claims to do and provides great economical coverage of your equipment.

WHAT I WOULD CHANGE
I do wish it did not take 7 days to fully cure, but your patience will be rewarded.  After the paint sets for 7 days will it come off? Like any paint it will take a fair amount abuse, but is not indestructible. Krylon's Fusion technology makes it the best DIY options for a simple camo paint job and if you do have a few scrapes, you can easily touch it back up quickly and easily.  If you need a solvent resistant finish such as on firearms, I recommend applying about 4-8 coats of spray flat laquer. In my tests this adds durability and will allow the paint to resist even the harshest of bore solvents.


 KELTEC SUB2000 CAMOUFLAGE PAINT JOB
 For my Keltec Sub2000 Rifle I wanted to do something different than basic black to make my Keltec a bit different. After removing the magazine, bolt, charging handle and masking off the serial number, barrel bore, chamber, sights, and magazine well, I coated the entire rifle in Ultra Flat Camo Black Krylon.  The next step was to place small masking tape masks to be peeled off at the very end of the paint job.


 The next step was to apply a complete coverage coat of Khaki and after dry, apply darker sand patterns  via the Krylon pattern overlays used for the Tripod project.  After that it was as simply as laying on color after color using stencils with Brown next, followed by Olive green, Light Folige Green and finally a few spots of the Black again.
  

All the masking tape masks were removed and after re-assembly I have to say I am very happy with the results.


KRYLON CAMOUFLAGE COLORS AVAILABLE
  • Black
  • Sand
  • Khaki
  • Woodland Light Green
  • Olive
  • Brown

SOURCES
Krylon
http://www.krylon.com/products/camouflage_paint_with_fusion_technology/

No comments: